Documentation / Tutorials / Tutorials & How to’s
How to configure aw2.subscribe shortcode to work with newsletter service GetResponse
/ Tutorials & How to’s / How to configure aw2.subscribe shortcode to work with newsletter service GetResponse
In this tutorial, we are going to see how we can use [aw2.subscribe] to capture subscribers to GetResponse. To start with first create an account (free/paid) of getresponse.com. You can subscribe to 30 days free trial account to start with.
STEP 1: Create an account of GetResponse
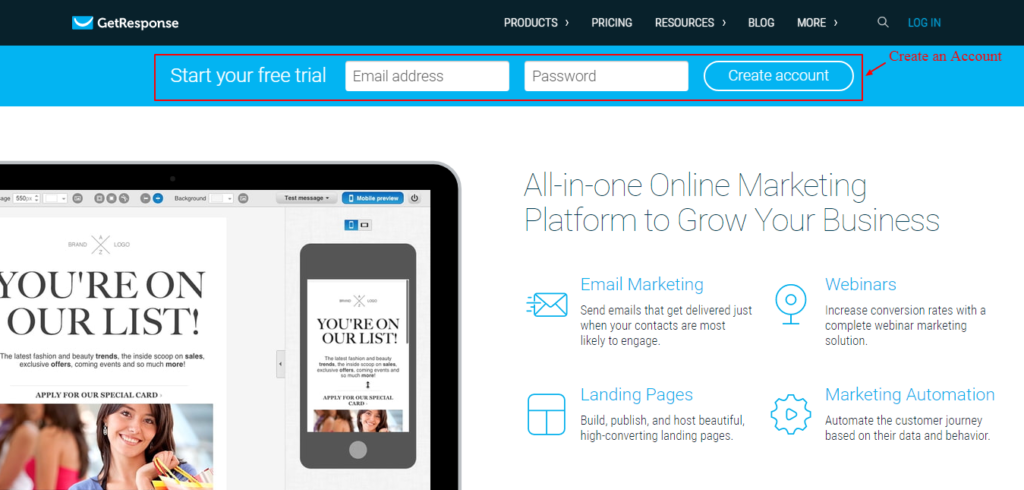
Screenshot 1: Create an account of GetResponse
Note: This tutorial does not cover the account creation process. There are few in between steps after creating the account and is left to the reader to follow the process of GetResponse to create the account.
After the account is created, and you can log in to getresponse.com and you will see a dashboard from which you can manage, right from creating a list to sending bulk newsletters.
Note: The scope of [aw2.subscribe] shortcode and this tutorial is about how to configure it to subscribe a contact to a predefined list of GetResponse newsletter service. GetResponse gives us lot of other features such as Landing pages, Webinars, Forms & surveys e.t.c. but we are focusing on just the Contact feature of GetResponse.
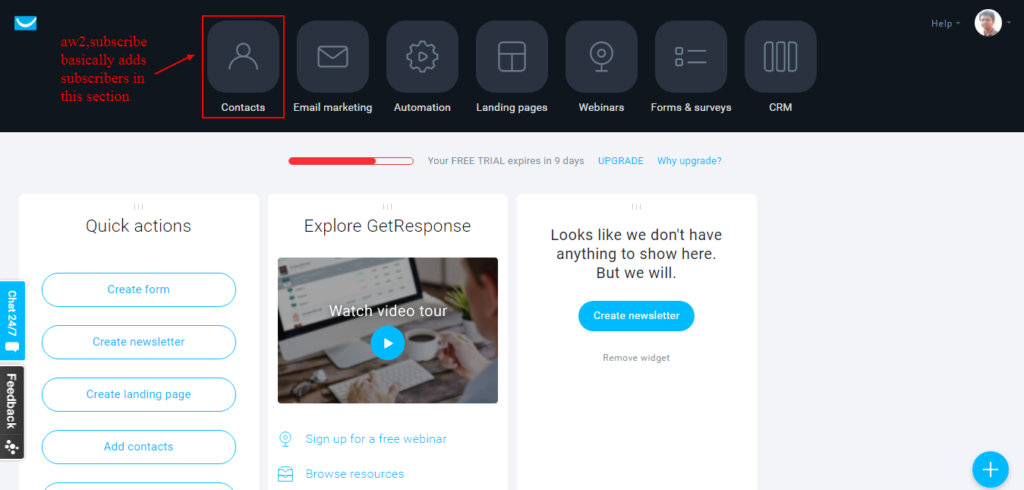
Screenshot 2: Contacts Section of GetResponse
By default, the GetResponse creates a list in the name of the e-mail address which was given at the time of creating the account. We will create a new list to understand the whole process of working with GetResponse.
STEP 2: Create a GetResponse List
a)To create a list click on "Contacts" tab from the main menu. On the contact tab, there is a button to create a list (as seen in below screenshot).

Screenshot 3: “Create List” Menu under Contacts Tab
b) After that enter the List name for which the subscribers are going to be added.
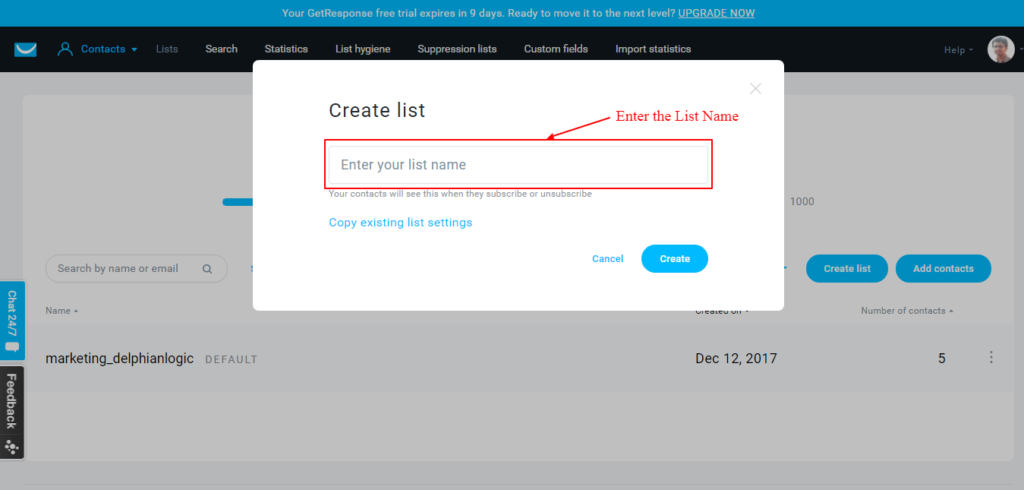
Screenshot 4: Enter the List name popup
After the newsletter is created it will show under "Contacts tab" as shown in below screenshot,
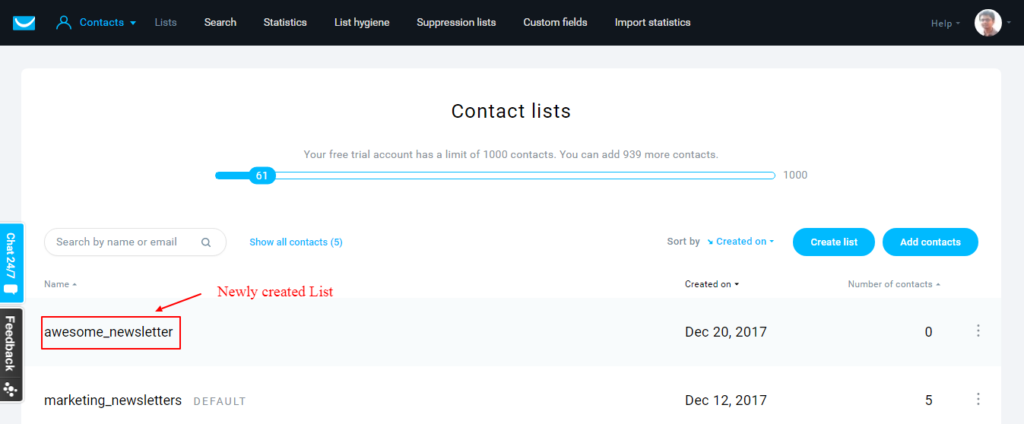
Screenshot 5: Newly created List of GetResponse
STEP 3: Get the List Token (called as ‘campaign_id’ ) to use with aw2.subscribe shortcode
To get the required parameter “campaign_id” of [aw2.subscribe] shortcode, go to contacts tab where all the lists are shown (as per screenshot 4 above). Hover over the menu of three dots of the newly created list, a popup menu will show up (as shown in below screenshot). Click on settings menu and it will take to the List settings page as shown in screenshot 7.
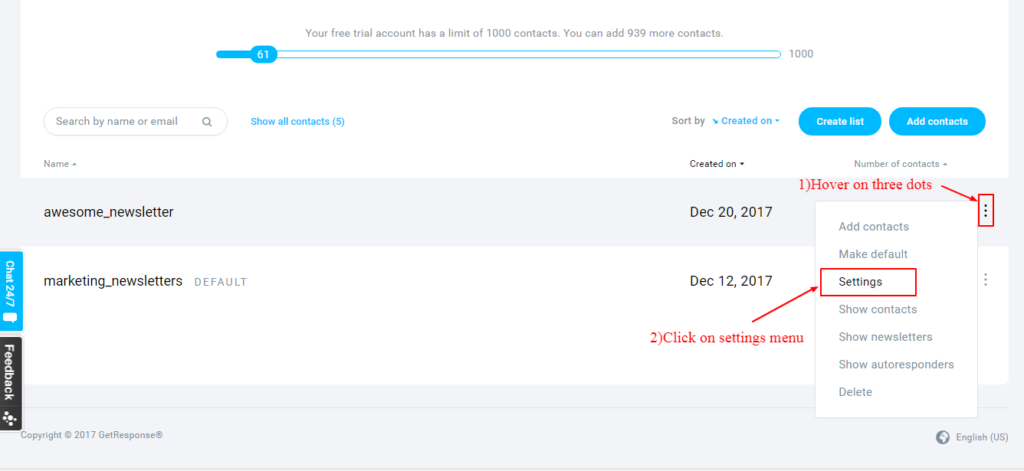
Screenshot 6: List Settings menu
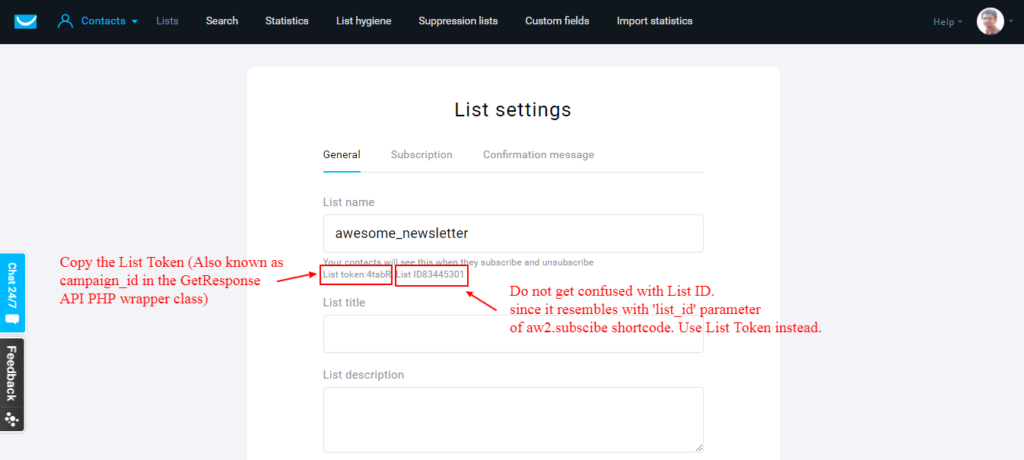
Screenshot 7: "List Settings" page
Note: An important thing to consider here is, with third-party newsletter service provider's, List-Id is used along with API key to add the subscriber to a specific list. But in the case of GetResponse, a List Token (also known as Campaign Id in the GetResponseClient PHP wrapper Class) is used. Do not get confused with List-Id under settings page of the list as shown in the above screenshot 7, since it resembles with 'list_id' parameter of [aw2.subscribe] shortcode. Use List Token instead and pass it to the "campaign_id" parameter of [aw2.subscribe] shortcode.
STEP 4: Get the API key from GetResponse
As shown in below screenshot 8, hover on "Account menu" (situated at the right side of the page) and click on "Integrations and API" submenu.
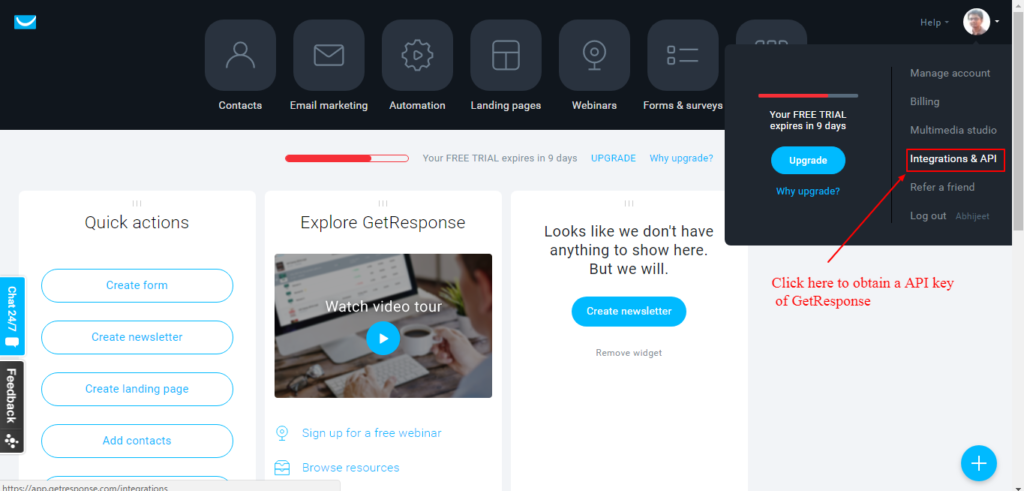
Screenshot 8: Integrations and API menu
After that click on API tab wherein you will find Default API key or a new API key can be generated as shown in below screenshot.

Screenshot 9: Copy default API key or create new API key.
STEP 5: Example of aw2.subscribe with GetResponse API
Following code snippet shows a simple newsletter form which captures subscribers emails, which will be added to GetResponse list specified in the [aw2.subscribe] shortcode. For documentation of this shortcode please refer here. This code is generally written as a module.
<!-- Stage-1: Form template starts here -->
[aw2.template main]
<section role="subscribe-section">
	<div id="[aw2.get module.post_id]"
class="social-wrapper[aw2.get module.class /] [aw2.get module.post_class /] [aw2.get module.post_unique_class /]">
    <div class="row">
      <div class="col-md-8 col-md-offset-2 col-lg-8 col-lg-offset-2 col-sm-10 col-sm-offset-1 col-xs-12 form-group newsletter">
        <form id="subscribe" novalidate>
          <div class="form-group">
  	        <div class="row no-gutters subscribe_form">
                  <div class="col-md-10 col-xs-10">
                   <input id="email" name="as_entries|meta|email"
          			       type="email"
          			       placeholder="Your Email"
          			       class="form-control" required email />
    	          </div>
    	        <div class="col-md-2 col-xs-2">
                 <button class="btn btn-primary btn-block form-control js-submit-job" role="form_handler"
            		         id="email_send">
                  <img src="[aw2.get function.site_url /]/wp-content/uploads/2017/09/submit-arrow.svg"/
                  alt="submit" title="image">
                </button>
              </div>
           </div>
         </div>
          <!-- Ajax form submit handled using SPA.js --->
    	  <script type=spa/axn axn='form.ajax' bind='submit' bind_selector="form#subscribe"
              disable_selector=".js-submit-job"
              route_ajax='[aw2.get module.slug /].subscribe_getresponse >
          </script>
        </form>
     </div>
    </div>
  </div>
</section>
[/aw2.template]
<!-- Stage-1: Form template ends here --->

<!-- Stage-2: Ajax form submit handler --->
[aw2.template subscribe_getresponse]

  <!-- Save into CPT using [aw2.save_form] shortcode -->
 [aw2.save_form tag='as_entries' set_post_id='module.entry_post_id']
    {
      "post_type":"as_entries",
      "post_title":"[aw2.get request.as_entries|meta|email /]",
      "post_status":"publish"
    }
  [/aw2.save_form]

<!-- Subscribe the submitted in email to GetResponse --->
 [aw2.subscribe getresponse email='{{aw2.get request.as_entries|meta|email}}' campaign_id="4yxsd" set="module.response"]
      [/aw2.subscribe]

<!-- It the variable “module.response” is set which means there was error returned from GetResponse hence we can optionally update the post meta of the “as_entries" CPT with the error message --->
[aw2.not_empty module.response]
   [aw2.query update_post_meta post_id="{module.entry_post_id}" meta_key="get_response_error_log" meta_value="{{aw2.get module.response}}" /]
[aw2.not_empty /]

<!-- Finally we show the success message to the User --->
 <template axn=selector.replace selector='#subscribe' get='me.html'>
     <p class="gray-white font-size-base font-bold text-center pad-x-3">Thank you.</p>
     <p class="gray-white font-size-base text-center pad-x-3">
       You are successfully subscribe to our help channel.
     </p>
  </template>
[/aw2.template]
Code Snippet 1: Subscribe to GetResponse
Stage 1: In the first stage of the module, we have a simple newsletter form input, with Id attribute as “email” and name attribute as "as_entries|meta|email". This name attribute tells the awesome studio, that it should save the email field into a CPT's (called as “as_entries” which should be created beforehand using triggers ), post meta with meta key as “email”. Also in the module, we have specified a <script> tag with type as “spa/axn” which basically handles the form submit using ajax with SPA.js library. This type attribute tells SPA library that, when a form with Id of “subscribe” is submitted, route it back again to the same module code which contains a template named as “subscribe_getresponse” (hence the route_ajax parameter is set to current module’s slug appended with the template of name “subscribe_getresponse”).
<script type=spa/axn axn='form.ajax' bind='submit' bind_selector="form#subscribe"
disable_selector=".js-submit-job" route_ajax='[aw2.get module.slug /].send_msg'>
</script>
Code Snippet 2: SPA call for AJAX form submit
Stage-2: The second stage handles the AJAX form submit. the submitted data is saved into CPT using [aw2.save_form] shortcode. Note that this step is purely optional. Next, we set the module variable called module.response to the string returned by the shortcode. If the variable module.response is set it means there was error returned from GetResponse. Hence we have optionally updated the post meta of the “as_entries” CPT with the error message itself. Note: All the errors messages returned by GetResponse are internally logged in to PHP error log file.
STEP 6 (Optional): Create Custom fields to pass additional metadata of Subscriber to GetResponse.
Sometimes there is a situation wherein we want to add some additional custom metadata such as Phone no., Address of subscriber. To add such extra metadata of subscriber in GetResponse we have to first create the required metadata (called as custom fields, in the GetResponse backend). Following screenshot depicts this,
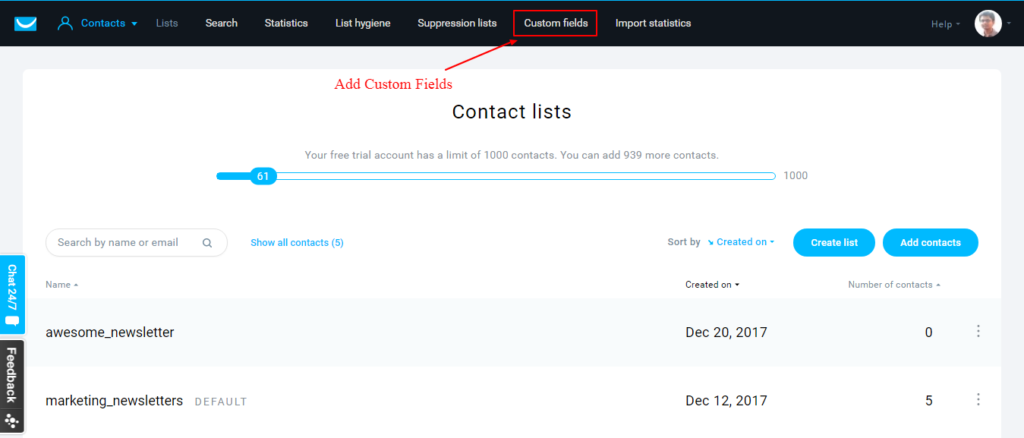
Screenshot 10: Custom Fields of GetResponse.
Below screenshot shows the default custom fields in GetResponse backend. We can create a new Custom Fields by clicking on "Create new" field as shown in screenshot 11 below.
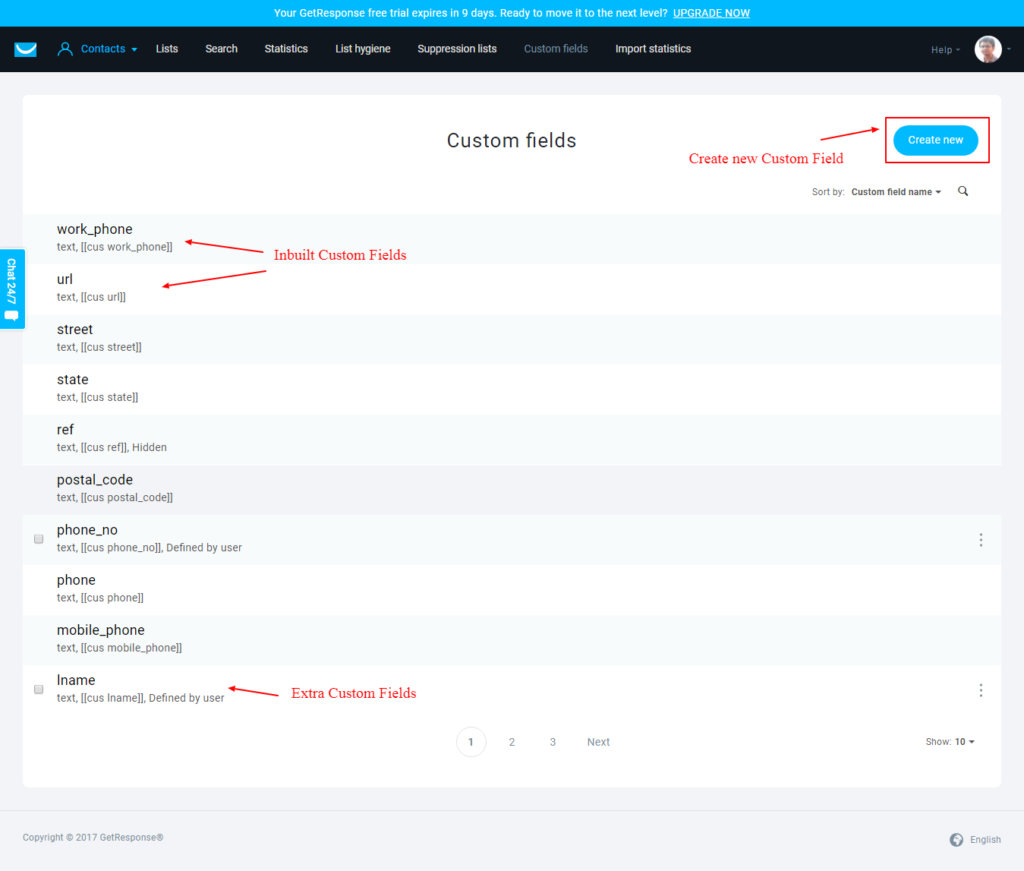
Screenshot 11: In Built Custom Fields and "Create new" Custom fields option of GetResponse.
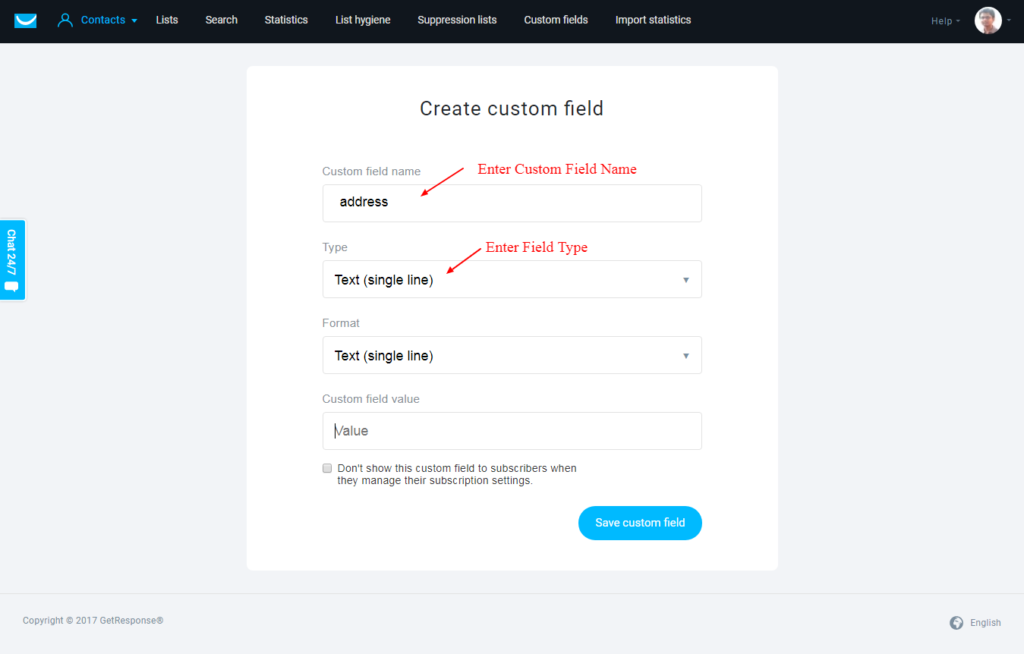
Screenshot 12: Create new Custom field.
Once required fields are created it will show under the custom fields tab a shown in above screenshot 11. these custom fields can be then passed with the field name (in lowercase format) into the JSON data inside the [aw2.subscribe] shortcode as shown below code snippet
[aw2.subscribe getresponse email='{{aw2.get request.newsletter|meta|email}}' ]
{
"address":"[aw2.get request.newsletter|meta|address /]",
}
[/aw2.subscribe]
Final Notes:
- The API key and Campaign Id should be passed carefully since even a single character misplaced would throw an error and the user will not be subscribed. For safer side copy it from GetResponse backend.For e.g. if the campaign id is “4ab6cd” and you accidentally passed the parameter as “4abcd” GetResponse would throw an error. This issue is not raised when we use global GetResponse site options since the campaign id is dynamically pulled from the API of GetResponse and stored it in site options.
- A similar case is for custom fields of GetResponse. If the field name is entered wrong, GetResponse will throw an error. To give an example if there is a field called “mobile_no” in the backend of GetResponse ) and while passing that custom field as JSON object, it is accidentally passed in as “mobil_no”, an error is returned, but it won't halt the AJAX form submit. The error will be logged in to PHP error log file silently and that error is returned from the shortcode.
That's it for this tutorial. In this tutorial, we saw how we can configure [aw2.subscribe] shortcode to work with GetResponse.