Documentation / Guide


# Install Awesome Studio Platform Plugin
The quickest way to install Awesome Studio plugin is by going to our 'Install' page, and specifying URL where you want to install.
In case that option does not work, you can download the plugin directly from WordPress.org, and follow the detailed instructions for manually installing Awesome Studio.


Thank you for your feedback. Your inputs, suggestions and feedback are extremely valuable and
help us serve our customers better
# Getting started with Awesome Studio Platform
A quick overview of the Awesome Studio plugin.
Thank you for your feedback. Your inputs, suggestions and feedback are extremely valuable and
help us serve our customers better
Install Awesome Studio Platform Plugin
The quickest way to install Awesome Studio plugin is by going to our 'Install' page, and specifying URL where you want to install.
In case that option does not work, you can download the plugin directly from WordPress.org, and follow the detailed instructions for manually installing Awesome Studio.
Thank you for your feedback. Your inputs, suggestions and feedback are extremely valuable and
help us serve our customers better
Install Monomyth Theme (optional)

To get most out of Awesome Studio, you will need to download and install Monomyth theme, you can find the detailed instruction for installation in "Installing monomyth theme" tutorial. Along with Monomyth zip file, you will also need to Import aw2_core posts xml, which is required for Monomyth to function normally.
While, installing Monomyth is optional for usage of Awesome Studio platform, it is strongly recommended. It makes Awesome Studio even more powerful and takes your development to next level for creating websites and application in WordPress. Most importantly it does not blot you website by loading unnecessary scripts and styles.
Thank you for your feedback. Your inputs, suggestions and feedback are extremely valuable and
help us serve our customers better
Enable Dev Mode
Once Awesome Studio platform plugin is installed, you need to go to your edit profile page and give your self developer access by selecting the checkbox.
Only administrators with developer access will be able to create, edit or delete modules and app within awesome studio, even editing or creating new core module for Monomyth theme requires developer access.

Thank you for your feedback. Your inputs, suggestions and feedback are extremely valuable and
help us serve our customers better
Quick Overview of Platform
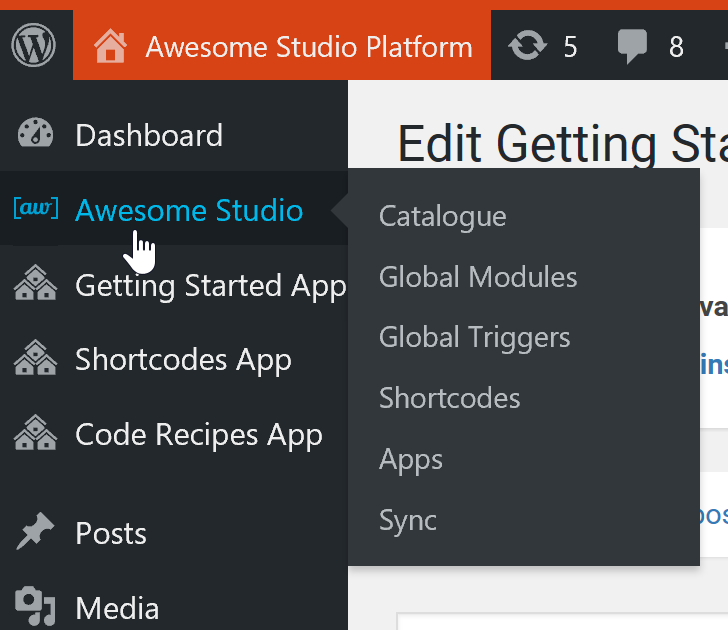
Awesome Studio platform is made up of core shortcodes library, custom shortcodes, modules and triggers. Modules & Triggers are also grouped together to form Apps.
Awesome Modules
Awesome Module is the building block of awesome studio platform and makes it the most reusable framework for WordPress. This is where we write all our HTML, CSS and JavaScripts, by putting all the dependencies of a module in one place, we make the future enchantments and manageability easier. A module can be called inside another module or page using aw2.module shortcode.
Awesome Triggers
Awesome triggers are special modules that are executed during various WordPress action and filter hooks. If you need to do some activity at init like register custom post types, load SPA libraries etc, this is where you write them. Currently on small number of useful WordPress hooks are supported.Awesome Shortcodes
This is another special type of module that allows you to wrap commonly used workflows within a project as shortcode. This allows us to use them as easy as we use other core shortcodes of awesome studio platform. These shortcodes can only be used within an awesome modules. For more details see aw2.shortcode.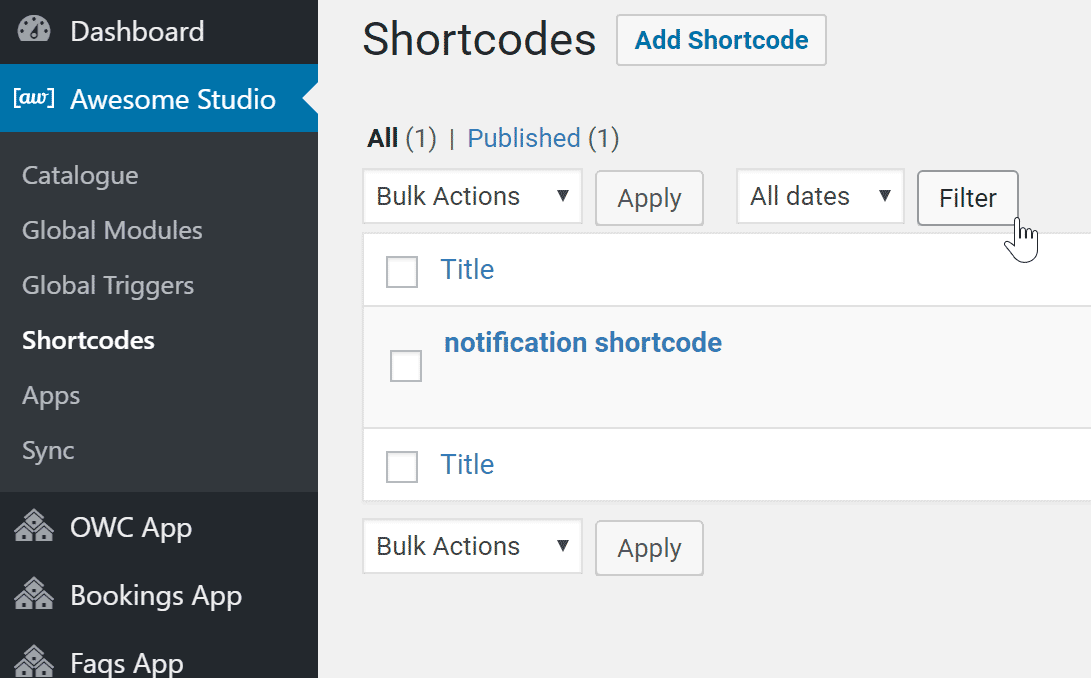

Awesome Apps
Awesome Apps takes over a slug to create custom workflows easily. The slug you create is taken over by awesome studio to give you custom flow. It has it's own set of modules and triggers. By using Awesome Apps you can package custom workflows neatly, and at the same time make future maintenance super simple.Awesome Core
Awesome Core modules are used by Monomyth theme to create global headers, footers and custom post layouts. These core modules can not be used by any other modules. but they can call and use global modules within them. It allows you to create custom post type and archive layouts quickly using existing modules.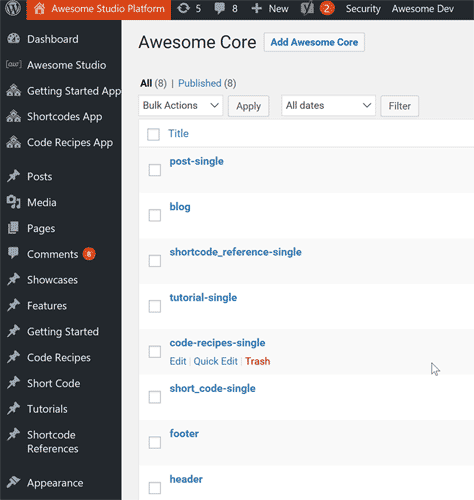
Awesome Catalogue
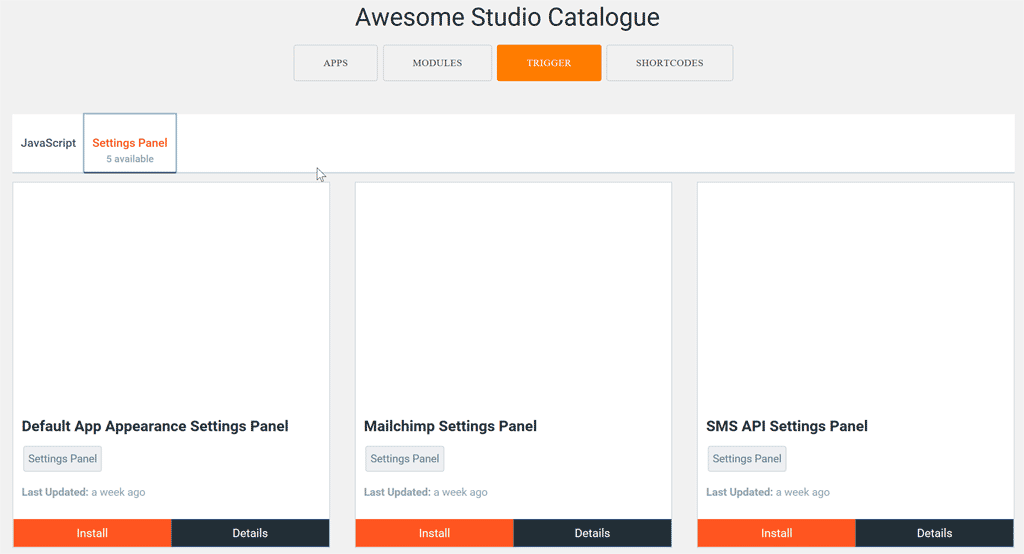
Awesome catalogue is list of ready to use modules, triggers, shortcodes and apps that you can install within your website in just one click and use. As our catalogue grows it will reduce development time further, as you can just install the module, include within your page and be done.
Thank you for your feedback. Your inputs, suggestions and feedback are extremely valuable and
help us serve our customers better
Creating Your First Awesome Module
Awesome Modules are the basic building blocks of a page within Awesome Studio platform. Within a website we first identify all the modules we need then we create/install them for use. We then use these ready modules to quickly assemble new layouts for our pages.
Here is how you can create and use a module.
- create a global module :
- Click on 'Awesome Studio' in the left panel and then click on 'Global Modules'.
- Click on 'Add Awesome Module'
- Let's Give our module a title, 'hello-awesome', we generally write the title in small letters and without spaces to ensure that the slug and title for the module are same making it easier to remember the slug of a module. We use the slug to refer these modules.
-
[aw2.set module.post_class='{{aw2.get module.slug}}_post' module.post_unique_class='{token}' /] [aw2.client less] .[aw2.get module.post_unique_class /]{ border: 1px dotted [aw2.get module.border-color /]; } .[aw2.get module.post_class /] { .section-title{ background-color:#000; color:#fff; } .intro{ color:#000; border: 1px solid red; margin:2px; } } [/aw2.client] <div class="[aw2.get module.post_unique_class /] [aw2.get module.post_class /] [aw2.get module.class /]"> <section title='[aw2.get module.slug /]'> <h2 class='section-title'>[aw2.get module.section_title /]</h2> <p class='intro'>[aw2.get module.introduction /]</p> </section> </div> - Click the publish button, you can also use 'crtl+s' to save the modules
- calling it within a page
- Now you have a published module that can be used within page or another module. let's see how to use awesome module.
- Click on pages -> add new page on the left panel.
- Give it a title "Test Awesome Module"
- In the content area type following
[aw2.module slug="hello-awesome"]
	[aw2.this module.section_title="Hello Awesome" /]
	[aw2.this module.introduction]
	 By creating a awesome module, you keeep all the dependecy of module in one place making it easier to maintain and change in future.
	[/aw2.this]
[/aw2.module]
- By using aw2.module you call a module, and by using aw2.this within aw2.module you can set the parameters of the module.
- Save the page, and view this page.
- Now let's call this module again within the same page
-
[aw2.module slug="hello-awesome"]
	[aw2.this module.section_title="Hello Awesome" /]
	[aw2.this module.introduction]
	 By creating a awesome module, you keeep all the dependecy of module in one place making it easier to maintain and change in future.
	[/aw2.this]
[/aw2.module]

[aw2.module slug="hello-awesome"]
[aw2.this module.border-color="#00ee00"]
[aw2.this module.section_title="Awesome Again" /]
	[aw2.this module.introduction]
	This is same awesome module, called again within the page
	[/aw2.this]
[/aw2.module]
- Save the page and check again. This is how we create and use a awesome module.
- calling it within another module
Thank you for your feedback. Your inputs, suggestions and feedback are extremely valuable and
help us serve our customers better
Creating Your First Awesome App
- Register your App (better install blank app from catalouge)
- Create App specific module
- Call them inside the App specific pages.
- Visit the App URL to see it working
Thank you for your feedback. Your inputs, suggestions and feedback are extremely valuable and
help us serve our customers better
# Setting up a VPS server for WordPress
Step by step guide to setup VPS server for running a WordPress website.
Thank you for your feedback. Your inputs, suggestions and feedback are extremely valuable and
help us serve our customers better
Introduction
In this guide we will see how to quickly and easily setup a webserver for running your WordPress website.
We will be setting up Nginx, MariyaDB and PHP 7 on a Ubuntu server, then we will setup LMD and ClamAV to reduce malware infection and configure fail2ban to block these attempts to infect the website. Finally, we will see how to quickly setup S3 based WordPress backup.
So, let's gets started.
Thank you for your feedback. Your inputs, suggestions and feedback are extremely valuable and
help us serve our customers better
Setting up the Server - Nginx, MySQL and PHP7 & Redis
Let's start by installing easyengine, it will help us setup rest of the things.
- wget -qO ee rt.cx/ee && sudo bash ee # install easyengine
- ee stack install
- ee stack remove --mysql
- nano /etc/apt/sources.list.d/ee-repo.list to edit the file and change the value from 10.1 to 10.2 for mariadb.
- ee stack install --mysql
- mysql -V
- you can get the root password at /etc/mysql/conf.d/my.cnf
- ee site create nxt.smartinstitute.net --wpfc --php7
- nano /etc/nginx/common/wpfc-php7.conf and add aw2_vsesssion in $http_cookie line.
php -r "copy('https://getcomposer.org/installer', 'composer-setup.php');"
php -r "if (hash_file('SHA384', 'composer-setup.php') === '93b54496392c062774670ac18b134c3b3a95e5a5e5c8f1a9f115f203b75bf9a129d5daa8ba6a13e2cc8a1da0806388a8') { echo 'Installer verified'; } else { echo 'Installer corrupt'; unlink('composer-setup.php'); } echo PHP_EOL;"
php composer-setup.php
php -r "unlink('composer-setup.php');"
mv composer.phar /usr/local/bin/composercd /var/www/22222/htdocs/db/pma composer update --no-devNow let's setup Redis
- add-apt-repository ppa:chris-lea/redis-server
- apt-get update
- apt-get install redis-server php-redis
phpRedisAdmin
- mkdir /var/www/22222/htdocs/cache/redis && cd /var/www/22222/htdocs/cache/redis
- git clone https://github.com/ErikDubbelboer/phpRedisAdmin.git
- cd phpRedisAdmin
- git clone https://github.com/nrk/predis.git vendor
WordPress Object Cache
- cd /var/www/example.com/htdocs/wp-content
- wget https://raw.githubusercontent.com/alleyinteractive/wp-redis/master/object-cache.php
- chown www-data: object-cache.php
- nano /var/www/yourdomain.ltd/conf/nginx/xmlrpc.conf
- And to add the following content in this .conf file :
location = /xmlrpc.php {
 deny all;
 access_log off;
 log_not_found off;
}
Disbale Cache-Control
This step is very specific for our use case (ie if you are using awesome studio plugin) , please ignore if not applicable to you.
- nano /etc/nginx/conf.d/fastcgi.conf
- On line number 9 you will find follwoing line
fastcgi_ignore_headers Cache-Control Expires Set-Cookie;
- repalce it with follwing line and save the file
fastcgi_ignore_headers Expires Set-Cookie;
- And run the command
service nginx reload
Thank you for your feedback. Your inputs, suggestions and feedback are extremely valuable and
help us serve our customers better
Enable SSL
Let's enable SSL using letsencrypt
- ee site update nxt.smartinstitute.net --letsencrypt
- which ee #to find the exact path of ee
- crontab -e
- update cron line to 0 0 * * 0 /usr/local/bin/ee site update --le=renew --all 2>> /var/log/ee/renew.log # Renew all letsencrypt SSL cert. Set by EasyEngine
Thank you for your feedback. Your inputs, suggestions and feedback are extremely valuable and
help us serve our customers better
Preventing Malware
We will be using Maldetect and ClamAV for virus and malware scaning to pervent infection on the server.
- wget http://www.rfxn.com/downloads/maldetect-current.tar.gz
- tar -zxvf maldetect-current.tar.gz
- cd maldetect-1.6.2/
- ./install.sh
- apt-get install apparmor-utils
- apt-get install inotify-tools
- apt-get install clamav
- apt-get install clamav-daemon
- aa-complain clamd
- service clamav-daemon start
- nano /usr/local/maldetect/conf.maldet
- nano /usr/local/maldetect/monitor_paths
- nano /usr/local/maldetect/ignore_file_ext
- service maldet start
Thank you for your feedback. Your inputs, suggestions and feedback are extremely valuable and
help us serve our customers better
Secure Your Server using Fail2ban
We use Fail2ban to parse log files and block IP address of malicious requests, just set up the fail2ban.
apt-get install fail2banAfter that simply add the following lines to jail.conf file.
jail.conf
--------------
[wordpress]
enabled  = true
port     = http,https
filter   = wordpress-auth
logpath  = /var/log/nginx/access.log
		   /var/log/nginx/wpoets.com.access.log

maxretry = 2
bantime  = 3600

[wordpress-extras]
enabled  = true
port     = http,https
filter   = wordpress-extras
logpath  = /var/log/nginx/access.log
		   /var/log/nginx/wpoets.com.access.log

maxretry = 1
bantime  = 43200
you will need to adjust the logpath above to point to actual log path on your server. maxretry is used to define the number of attempts before banning and bantime is used to define the number of seconds to ban the IP address. Now create wordpress-auth.conf and wordpress-extras.conf file within filter.d folder using code mentioned below, you can put your own regex pattern in failregex key.
wordpress-auth.conf
---------------------

[Definition]
failregex = <HOST>.*POST.*(wp-login\.php|xmlrpc\.php).* 403
            <HOST>.*POST.*\/wp-content\/.*\.php
ignoreregex =
wordpress-extras.conf
----------------------------
[Definition]
failregex = <HOST>.*POST.*\/wp-content\/.*\.php
	    <HOST>.*POST.*\/wp-includes\/js\/.*\.php
	    <HOST>.*GET.*\/Purchase-2017
	    <HOST>.*GET.*\/Holidays-Card
	    <HOST>.*GET.*\/Outstanding-INVOICE-VVX
	    <HOST>.*GET.*\/oboskej
	    <HOST>.*GET.*\/vlnoeiw
	    <HOST>.*GET.*\/vlaofr
	    <HOST>.*GET.*\/ljysix
	    <HOST>.*GET.*\/journal\/y5eh2\.php
	    <HOST>.*GET.*\/blnoitez
	    <HOST>.*GET.*\/updatecorex\/
	    <HOST>.*GET.*\/wp-caches\.php
		<HOST>.*POST.*(wp-login\.php|xmlrpc\.php).* 499
		<HOST>.*POST.*\/wp-includes\/images\/.*\.php
		<HOST>.*POST.*\/wp-admin\/css\/colors\/.*\.php
		<HOST>.*POST.*\/wp-includes\/rest-api\/fields\/.*\.php


ignoreregex =
Finally just restart fail2ban using
service fail2ban restartIn case you get an error while restarting, make sure you don't have the jail.local file, in case it is present make it blank.
Thank you for your feedback. Your inputs, suggestions and feedback are extremely valuable and
help us serve our customers better
Setting Up Backup Strategy
Thank you for your feedback. Your inputs, suggestions and feedback are extremely valuable and
help us serve our customers better
Quickly Creating Development Environment
Prerequisites
EasyEngine v3 or aboveInstalling
Create the wordpress site by using EasyEngine for EE3ee site create example.com --wp
ee site create example.com --type=wp --cache
wget "https://raw.githubusercontent.com/WPoets/aw-setup/master/ee3-setup.sh"
wget "https://raw.githubusercontent.com/WPoets/aw-setup/master/ee4-setup.sh"
chmod u+x ee3-setup.sh
chmod u+x ee4-setup.sh
Running the Script
Use below command to configure any wordpress site with Awesome Enterprise for EE3./ee3-setup.sh example.com
./ee4-setup.sh example.com
Adding new WP user
To add new WP user this script will promt you to register new user. enter y to add new user and follow the procedure.Enabling the EE Admin-Tools(Only available in EE4)
To enable the admin tools enter y when this script ask to enable the admin tools.
Thank you for your feedback. Your inputs, suggestions and feedback are extremely valuable and
help us serve our customers better
# Install Monomyth Theme (optional)
To get most out of Awesome Studio, you will need to download and install Monomyth theme, you can find the detailed instruction for installation in "Installing monomyth theme" tutorial. Along with Monomyth zip file, you will also need to Import aw2_core posts xml, which is required for Monomyth to function normally.
While, installing Monomyth is optional for usage of Awesome Studio platform, it is strongly recommended. It makes Awesome Studio even more powerful and takes your development to next level for creating websites and application in WordPress. Most importantly it does not blot you website by loading unnecessary scripts and styles.
Thank you for your feedback. Your inputs, suggestions and feedback are extremely valuable and
help us serve our customers better
# Introduction
In this guide we will see how to quickly and easily setup a webserver for running your WordPress website.
We will be setting up Nginx, MariyaDB and PHP 7 on a Ubuntu server, then we will setup LMD and ClamAV to reduce malware infection and configure fail2ban to block these attempts to infect the website. Finally, we will see how to quickly setup S3 based WordPress backup.
So, let's gets started.
Thank you for your feedback. Your inputs, suggestions and feedback are extremely valuable and
help us serve our customers better
# Enable Dev Mode
Once Awesome Studio platform plugin is installed, you need to go to your edit profile page and give your self developer access by selecting the checkbox.
Only administrators with developer access will be able to create, edit or delete modules and app within awesome studio, even editing or creating new core module for Monomyth theme requires developer access.
Thank you for your feedback. Your inputs, suggestions and feedback are extremely valuable and
help us serve our customers better
# Setting up the Server - Nginx, MySQL and PHP7 & Redis
Let's start by installing easyengine, it will help us setup rest of the things.
- wget -qO ee rt.cx/ee && sudo bash ee # install easyengine
- ee stack install
- ee stack remove --mysql
- nano /etc/apt/sources.list.d/ee-repo.list to edit the file and change the value from 10.1 to 10.2 for mariadb.
- ee stack install --mysql
- mysql -V
- you can get the root password at /etc/mysql/conf.d/my.cnf
- ee site create nxt.smartinstitute.net --wpfc --php7
- nano /etc/nginx/common/wpfc-php7.conf and add aw2_vsesssion in $http_cookie line.
php -r "copy('https://getcomposer.org/installer', 'composer-setup.php');"
php -r "if (hash_file('SHA384', 'composer-setup.php') === '93b54496392c062774670ac18b134c3b3a95e5a5e5c8f1a9f115f203b75bf9a129d5daa8ba6a13e2cc8a1da0806388a8') { echo 'Installer verified'; } else { echo 'Installer corrupt'; unlink('composer-setup.php'); } echo PHP_EOL;"
php composer-setup.php
php -r "unlink('composer-setup.php');"
mv composer.phar /usr/local/bin/composercd /var/www/22222/htdocs/db/pma composer update --no-devNow let's setup Redis
- add-apt-repository ppa:chris-lea/redis-server
- apt-get update
- apt-get install redis-server php-redis
phpRedisAdmin
- mkdir /var/www/22222/htdocs/cache/redis && cd /var/www/22222/htdocs/cache/redis
- git clone https://github.com/ErikDubbelboer/phpRedisAdmin.git
- cd phpRedisAdmin
- git clone https://github.com/nrk/predis.git vendor
WordPress Object Cache
- cd /var/www/example.com/htdocs/wp-content
- wget https://raw.githubusercontent.com/alleyinteractive/wp-redis/master/object-cache.php
- chown www-data: object-cache.php
- nano /var/www/yourdomain.ltd/conf/nginx/xmlrpc.conf
- And to add the following content in this .conf file :
location = /xmlrpc.php {
 deny all;
 access_log off;
 log_not_found off;
}
Disbale Cache-Control
This step is very specific for our use case (ie if you are using awesome studio plugin) , please ignore if not applicable to you.
- nano /etc/nginx/conf.d/fastcgi.conf
- On line number 9 you will find follwoing line
fastcgi_ignore_headers Cache-Control Expires Set-Cookie;
- repalce it with follwing line and save the file
fastcgi_ignore_headers Expires Set-Cookie;
- And run the command
service nginx reload
Thank you for your feedback. Your inputs, suggestions and feedback are extremely valuable and
help us serve our customers better
# Quick Overview of Platform
Awesome Studio platform is made up of core shortcodes library, custom shortcodes, modules and triggers. Modules & Triggers are also grouped together to form Apps.
Awesome Modules
Awesome Module is the building block of awesome studio platform and makes it the most reusable framework for WordPress. This is where we write all our HTML, CSS and JavaScripts, by putting all the dependencies of a module in one place, we make the future enchantments and manageability easier. A module can be called inside another module or page using aw2.module shortcode.Awesome Triggers
Awesome triggers are special modules that are executed during various WordPress action and filter hooks. If you need to do some activity at init like register custom post types, load SPA libraries etc, this is where you write them. Currently on small number of useful WordPress hooks are supported.Awesome Shortcodes
This is another special type of module that allows you to wrap commonly used workflows within a project as shortcode. This allows us to use them as easy as we use other core shortcodes of awesome studio platform. These shortcodes can only be used within an awesome modules. For more details see aw2.shortcode.Awesome Apps
Awesome Apps takes over a slug to create custom workflows easily. The slug you create is taken over by awesome studio to give you custom flow. It has it's own set of modules and triggers. By using Awesome Apps you can package custom workflows neatly, and at the same time make future maintenance super simple.Awesome Core
Awesome Core modules are used by Monomyth theme to create global headers, footers and custom post layouts. These core modules can not be used by any other modules. but they can call and use global modules within them. It allows you to create custom post type and archive layouts quickly using existing modules.Awesome Catalogue
Awesome catalogue is list of ready to use modules, triggers, shortcodes and apps that you can install within your website in just one click and use. As our catalogue grows it will reduce development time further, as you can just install the module, include within your page and be done.
Thank you for your feedback. Your inputs, suggestions and feedback are extremely valuable and
help us serve our customers better
# Enable SSL
Let's enable SSL using letsencrypt
- ee site update nxt.smartinstitute.net --letsencrypt
- which ee #to find the exact path of ee
- crontab -e
- update cron line to 0 0 * * 0 /usr/local/bin/ee site update --le=renew --all 2>> /var/log/ee/renew.log # Renew all letsencrypt SSL cert. Set by EasyEngine
Thank you for your feedback. Your inputs, suggestions and feedback are extremely valuable and
help us serve our customers better
# Creating Your First Awesome Module
Awesome Modules are the basic building blocks of a page within Awesome Studio platform. Within a website we first identify all the modules we need then we create/install them for use. We then use these ready modules to quickly assemble new layouts for our pages.
Here is how you can create and use a module.
- create a global module :
- Click on 'Awesome Studio' in the left panel and then click on 'Global Modules'.
- Click on 'Add Awesome Module'
- Let's Give our module a title, 'hello-awesome', we generally write the title in small letters and without spaces to ensure that the slug and title for the module are same making it easier to remember the slug of a module. We use the slug to refer these modules.
-
[aw2.set module.post_class='{{aw2.get module.slug}}_post' module.post_unique_class='{token}' /] [aw2.client less] .[aw2.get module.post_unique_class /]{ border: 1px dotted [aw2.get module.border-color /]; } .[aw2.get module.post_class /] { .section-title{ background-color:#000; color:#fff; } .intro{ color:#000; border: 1px solid red; margin:2px; } } [/aw2.client] <div class="[aw2.get module.post_unique_class /] [aw2.get module.post_class /] [aw2.get module.class /]"> <section title='[aw2.get module.slug /]'> <h2 class='section-title'>[aw2.get module.section_title /]</h2> <p class='intro'>[aw2.get module.introduction /]</p> </section> </div> - Click the publish button, you can also use 'crtl+s' to save the modules
- calling it within a page
- Now you have a published module that can be used within page or another module. let's see how to use awesome module.
- Click on pages -> add new page on the left panel.
- Give it a title "Test Awesome Module"
- In the content area type following
[aw2.module slug="hello-awesome"]
	[aw2.this module.section_title="Hello Awesome" /]
	[aw2.this module.introduction]
	 By creating a awesome module, you keeep all the dependecy of module in one place making it easier to maintain and change in future.
	[/aw2.this]
[/aw2.module]
- By using aw2.module you call a module, and by using aw2.this within aw2.module you can set the parameters of the module.
- Save the page, and view this page.
- Now let's call this module again within the same page
-
[aw2.module slug="hello-awesome"]
	[aw2.this module.section_title="Hello Awesome" /]
	[aw2.this module.introduction]
	 By creating a awesome module, you keeep all the dependecy of module in one place making it easier to maintain and change in future.
	[/aw2.this]
[/aw2.module]

[aw2.module slug="hello-awesome"]
[aw2.this module.border-color="#00ee00"]
[aw2.this module.section_title="Awesome Again" /]
	[aw2.this module.introduction]
	This is same awesome module, called again within the page
	[/aw2.this]
[/aw2.module]
- Save the page and check again. This is how we create and use a awesome module.
- calling it within another module
Thank you for your feedback. Your inputs, suggestions and feedback are extremely valuable and
help us serve our customers better
# Preventing Malware
We will be using Maldetect and ClamAV for virus and malware scaning to pervent infection on the server.
- wget http://www.rfxn.com/downloads/maldetect-current.tar.gz
- tar -zxvf maldetect-current.tar.gz
- cd maldetect-1.6.2/
- ./install.sh
- apt-get install apparmor-utils
- apt-get install inotify-tools
- apt-get install clamav
- apt-get install clamav-daemon
- aa-complain clamd
- service clamav-daemon start
- nano /usr/local/maldetect/conf.maldet
- nano /usr/local/maldetect/monitor_paths
- nano /usr/local/maldetect/ignore_file_ext
- service maldet start
Thank you for your feedback. Your inputs, suggestions and feedback are extremely valuable and
help us serve our customers better
# Secure Your Server using Fail2ban
We use Fail2ban to parse log files and block IP address of malicious requests, just set up the fail2ban.
apt-get install fail2banAfter that simply add the following lines to jail.conf file.
jail.conf
--------------
[wordpress]
enabled  = true
port     = http,https
filter   = wordpress-auth
logpath  = /var/log/nginx/access.log
		   /var/log/nginx/wpoets.com.access.log

maxretry = 2
bantime  = 3600

[wordpress-extras]
enabled  = true
port     = http,https
filter   = wordpress-extras
logpath  = /var/log/nginx/access.log
		   /var/log/nginx/wpoets.com.access.log

maxretry = 1
bantime  = 43200
you will need to adjust the logpath above to point to actual log path on your server. maxretry is used to define the number of attempts before banning and bantime is used to define the number of seconds to ban the IP address. Now create wordpress-auth.conf and wordpress-extras.conf file within filter.d folder using code mentioned below, you can put your own regex pattern in failregex key.
wordpress-auth.conf
---------------------

[Definition]
failregex = <HOST>.*POST.*(wp-login\.php|xmlrpc\.php).* 403
            <HOST>.*POST.*\/wp-content\/.*\.php
ignoreregex =
wordpress-extras.conf
----------------------------
[Definition]
failregex = <HOST>.*POST.*\/wp-content\/.*\.php
	    <HOST>.*POST.*\/wp-includes\/js\/.*\.php
	    <HOST>.*GET.*\/Purchase-2017
	    <HOST>.*GET.*\/Holidays-Card
	    <HOST>.*GET.*\/Outstanding-INVOICE-VVX
	    <HOST>.*GET.*\/oboskej
	    <HOST>.*GET.*\/vlnoeiw
	    <HOST>.*GET.*\/vlaofr
	    <HOST>.*GET.*\/ljysix
	    <HOST>.*GET.*\/journal\/y5eh2\.php
	    <HOST>.*GET.*\/blnoitez
	    <HOST>.*GET.*\/updatecorex\/
	    <HOST>.*GET.*\/wp-caches\.php
		<HOST>.*POST.*(wp-login\.php|xmlrpc\.php).* 499
		<HOST>.*POST.*\/wp-includes\/images\/.*\.php
		<HOST>.*POST.*\/wp-admin\/css\/colors\/.*\.php
		<HOST>.*POST.*\/wp-includes\/rest-api\/fields\/.*\.php


ignoreregex =
Finally just restart fail2ban using
service fail2ban restartIn case you get an error while restarting, make sure you don't have the jail.local file, in case it is present make it blank.
Thank you for your feedback. Your inputs, suggestions and feedback are extremely valuable and
help us serve our customers better
# Creating Your First Awesome App
- Register your App (better install blank app from catalouge)
- Create App specific module
- Call them inside the App specific pages.
- Visit the App URL to see it working
Thank you for your feedback. Your inputs, suggestions and feedback are extremely valuable and
help us serve our customers better
# Setting Up Backup Strategy
Thank you for your feedback. Your inputs, suggestions and feedback are extremely valuable and
help us serve our customers better
# Quickly Creating Development Environment
Prerequisites
EasyEngine v3 or aboveInstalling
Create the wordpress site by using EasyEngine for EE3ee site create example.com --wp
ee site create example.com --type=wp --cache
wget "https://raw.githubusercontent.com/WPoets/aw-setup/master/ee3-setup.sh"
wget "https://raw.githubusercontent.com/WPoets/aw-setup/master/ee4-setup.sh"
chmod u+x ee3-setup.sh
chmod u+x ee4-setup.sh
Running the Script
Use below command to configure any wordpress site with Awesome Enterprise for EE3./ee3-setup.sh example.com
./ee4-setup.sh example.com
Adding new WP user
To add new WP user this script will promt you to register new user. enter y to add new user and follow the procedure.Enabling the EE Admin-Tools(Only available in EE4)
To enable the admin tools enter y when this script ask to enable the admin tools.
Thank you for your feedback. Your inputs, suggestions and feedback are extremely valuable and
help us serve our customers better