Documentation / Tutorials / Generic
How to do social authentication using linkedin
/ Generic / How to do social authentication using linkedin
We can authenticate our application users through our local authentication mechanisms such as traditional username, password, or OTP-based authentication but in this approach, we are the one who is checking the authenticity of the user. But what if someone is already verified the authenticity of a user or somebody else can !. This is where social login authentication comes into action.
Step 1:
Here we are discussing LinkedIn social authentication. First of all, we have to create an app in https://www.linkedin.com/developers/.
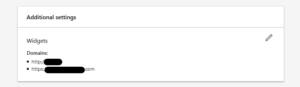
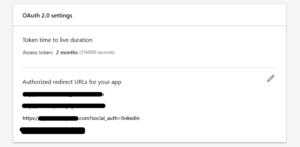
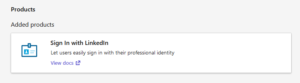
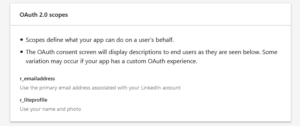
Once you have created the app, configure the app with the authorized domain, authorized redirect URLs, and OAuth 2.0 Scopes (r_emailaddress and r_liteprofile). For the scopes, you may have to add the SignIn product from the products tab. Once you have configures the above ones you should copy the Client ID and Client Secret.
Sample redirect URL: https://example.com?social_auth=linkedin
Use below screen snippets for a hustle free setup
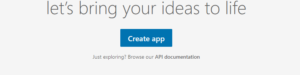
#1 – Create App
#2 – Set Domain
#3 – Set Redirect URIs (Inside Auth Tab)
#4 – Add Sign In with LinkedIn Product into your app
#5 – Make sure that you have these scopes
Step 2:
Go to our Awesome Core Settings and create two settings
- opt-linkedin-id
- opt-linkedin-secret
Paste the Client ID and Client Secret that we have got from the previous step
Step 3:
- Add “linkedin_service” into Awesome Core “services”
1[services.add linkedin_service service_label='LinkedIn Service' post_type='linkedin_service' desc='Linkedin Service' /] - Import “linkedin_service”
https://raw.githubusercontent.com/WPoets/awesomeapps/main/services/linkedin/linkedin_service%20.xml
Use this link and import the XML for creating the linkedin_service
Step 4:
Go to your “Login” app or any app where you have to implement the social login.
- Add our login button snippet
123456789101112131415161718192021222324[templates.add main]<script type='text/javascript' src='https://cdn.getawesomestudio.com/lib/jquery/1.11.3/jquery.min.js'> </script><script>jQuery( document ).ready(function( $ ) {$.getScript('[env.get settings.cdn /]spa/spa.v2.min.js', function() {spa.app.start({homeurl:'[php.site_url /]',cdn:'[env.get settings.cdn /]',path:'[app.path /]/'});});});</script><div class="form-fields row">[linkedin_service.login app_id='{env.settings.opt-linkedin-id}' app_secret='{env.settings.opt-linkedin-secret}' scope='r_liteprofile,r_emailaddress' o.set='module.linkedin' /]<template axn=cookie.set get='[module.get linkedin.ticket_id /]' set='linkedin_login' hour=true></template><a href='[module.get linkedin.url /]?redirect_to=https://alpha.wordpoets.com/sooraj-poetry/linkedin-handler' title="Linkedin"><div class="align-items-center br br-5 justify-content-center no-margin-left-md row mar-b-5" style="border-color: #0077B7;"><i class="font-size-jumbo icon-linkedin" style="color: #0077B7;"></i><span class="gray"> Linkedin</span></div></a></div>[/templates.add]
Note: We are using <template> for setting the cookie, so please make sure that you have spa.js loaded - Create a module inside your app called “linkedin-handler”
12345678910111213141516171819[templates.add main]<script type='text/javascript' src='https://cdn.getawesomestudio.com/lib/jquery/1.11.3/jquery.min.js'> </script><script>jQuery( document ).ready(function( $ ) {$.getScript('[env.get settings.cdn /]spa/spa.v2.min.js', function() {spa.app.start({homeurl:'[php.site_url /]',cdn:'[env.get settings.cdn /]',path:'[app.path /]/'});});});</script>[session_ticket.get {request.t} field='user_data' o.set='module.user_data' /][module.get user_data dump="true" /]//** Here you have the authenticated user details **//[/templates.add]
- Process your user data and do the necessary changes to your code
Eg: Once you have the user data you can set the session
1[vsession.set key=email value='{module.user_data.email}' ttl='14400' /]
In the previous step we got out authenticated user data, but that’s not the end of the story. You will have to set the session for this user or you may respond with a bearer token or a JWT depends on what kind of application you are building.